
Introduction
Operating Systems and Distributions
Raspberry Pi Hardware
Connecting your Raspberry Pi
Getting started with the Raspberry Pi with basic terminal
The Graphical Desktop
Applications, Tools & Servers
Administration
Networking
Introduction
The Raspberry Pi is a small computer about the size of a credit card and costs
approximately 30€. It was developed in the UK by the Raspberry Pi foundation. The
foundation believes that many children and teenagers have become passive users of
computers without understanding how a computer actually functions. The foundation
created the Raspberry Pi with the intention of teaching children how computers work and
how to program them.
The Raspberry Pi device features very capable video performance with the ability to play
Blu-ray quality movies and fully featured 2D and 3D games. The video output can be
plugged directly into a TV via the HDMI port or the older type composite video for older
TV’s. The reason for the older type TV connection is because in many parts of the world,
this is the only input available for older type TV’s. The intention of the Raspberry Pi was to
reach as many people as possible, especially those on a budget.
The device sports and ARM processor running at 700mhz (max 1000mhz) which can be tweaked to
run at a faster speed. ARM processors are mainly used in small devices such as mobile phones,
hand held mobile gaming devices and other small digital devices.
The Raspberry Pi does not have a hard drive like traditional computers do but relies on
an SD card for the starting up and storing information. The SD card contains the operating
system and data needed to run it. The operating system tells the Raspberry Pi how to
function and how to handle any input from the user. It also manages the computer’s memory
and programs. The operating system that we will cover in this book will be the GNU/Linux
operating system, specifically Debian.
It has a total memory of 512MB, which does not sound like much at all compared to
computers out today, but even with this memory limitation, the Raspberry Pi can achieve
high results. To overcome this limitation, the operating system is not processor or memory
hungry, which allows programs running on the Raspberry Pi to use very low amounts of
memory. The GNU/Linux operating system is able to take full advantage of this due to its
optimisation combined with the ARM processor.
The Raspberry Pi does not come with a case which, although at first seems ludicrous, has
its advantages. Firstly, you are able to identify each component on the board and therefore
learn more about its process and function in the device. Secondly, you have the ability to
create your own case for it or embed it into another device, such as a monitor. Thirdly, it
greatly reduces the cost. The low cost of the device means that it available to almost anyone
who wants to learn or who is seeking a low cost computer.
Operating Systems and Distributions
The Raspberry Pi supports the GNU/Linux operating system which is
available in many flavours called, distributions or distros for short. There are many
distributions including Debian , Raspbian (Debian “wheezy”), Arch Linux, Risc OS, ...
Each distribution contains its own set of programs and its own way of managing programs, commonly
referred to as package managers.
Some distributions offer a media only type environment, which allow movies, music and
images to be displayed and organised. A media centre version is
available for the Raspberry Pi called Raspbmc. Raspbmc is a minimal distribution that is
based on Debian and like many other distributions, it is free and open source. The advantage
of using a media centre is that you can stream movies or music directly to your Raspberry Pi
via the internet.
Knowledge of Gnu/Linux is not required to use Raspbmc because the developers have
created a clean and easy to use graphical interface. This has the advantage of hiding
complex commands needed to view movies, play music and view images. It is simple to
install using a PC, MAC or Linux and has the ability to automatically update when required.
Media content can be shared on other computers on your network, which your Raspberry Pi
has the ability to access and play back. It also boasts the ability to use AirPlay and send the
content directly to your TV in the form of streaming.
Below is a list of distributions currently available.
- Raspbian is the best performing distribution (hard FP - .hf).
- Arch Linux is for advanced users as its purpose is to give full control over to the user.
- Debian is recommended for the simplest of installs. This will get you up and running
quickly (soft FP - .el).
- Fedora Remix was the recommended distribution but is currently plagued with problems.
- Raspbmc is recommended if you only require a media centre.
- Arch Lunix is recommended for embedded devices.
We recommend that you download the Raspbian distribution, which is by far the easy to use and install.
We would also recommend that you check out the capabilities of Raspbmc because of its easy to
use interface and amazing media capabilities. This will give you and overview on what your
Raspberry Pi’s capability is and an idea on the performance of the device.
Raspberry Pi Hardware
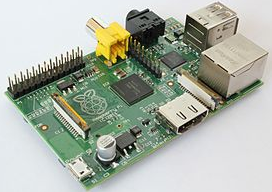
First, we will describe the hardware and what we mean by hardware. Hardware can be
thought of as physical devices that can be touched or held, like a hard drive, a mobile phone
and so on. Software can be thought of as a program or a collection of programs that
instructs a computer on what to do and how to do it. Below is an image of the Raspberry Pi,
which describes the components that make up the hardware.
1) The micro USB power port is used to power the Raspberry Pi device. You will plug in the micro
USB power supply into the device to power it up.
2) The HDMI output is used to plug into a modern television or monitor. This is required so that you
can see the output from the device.
3) The Ethernet port is used to connect the Raspberry Pi to the internet or a local network.
4) USB 2.0 ports are used to plug in a keyboard, mouse, web cam, external USB hubs and so on.
5) The audio output can be used to plug into an external amplifier.
6) The video output is used if you have an older type television.
7) The ARM processor with GPU and 512 RAM can be thought of as the brains on the Raspberry Pi.
8) The SD card contains the operating system. The operating system is a collection of software that
allows you to create files, open programs, plays music, games and manages the whole system. In order
to use your Raspberry Pi, the SD card must be present and must contain a valid operating system.
Connecting your Raspberry Pi
Your SD card should already be inserted into your Raspberry Pi before you perform the
following steps. The following numbers correspond to the above labelled numbers in the
image above.
1) DO NOT CONNECT YOUR POWER SUPPLY. This will be done when everything is plugged in.
2) Connect your HDMI cable to the HDMI output port. This will apply if you have a
modern TV or monitor. If you don’t have either of these, you will need to perform step 6
and then continue to step 3.
3) Connect your network cable to the Ethernet port assuming that you want to access the
internet or a network.
4) Connect your keyboard and mouse into the USB 2.0 ports.
5) Connect your audio cable. This is only required if you do not or can’t use sound via
the HDMI output.
6) Connect your cable to the TV. This is only required if you have an old TV.
The final step is to connect the power supply. There is no power switch with the Raspberry
Pi and the only way to start up the device is by plugging in the power supply and switching
it on from the mains. The power supply uses a micro USB power connector which is used by many
modern mobile phones. The PSU or power supply unit must supply 5V and at least 700mA.
Always be sure to check these values when looking for a suitable power supply.
There are 2 USB ports on the Raspberry Pi but this can be extended by using a USB hub
which also plugs directly into one of the USB ports on the Raspberry Pi. You can then plug
your keyboard, mouse or wireless dongle into the HUB, freeing up a USB port on your
Raspberry Pi. The USB hub must have its own power supply otherwise the Raspberry Pi
will not be able to detect it.
It is recommend that you purchase a USB hub because the
constant unplugging of the USB connectors could cause the connectors to become loose.
If you do not use an external USB HUB, then you can plug your mouse and keyboard
directly into the USB ports on your Raspberry Pi. If you do have a wireless adapter then this
can also be plugged in but you will lose the ability to plug in your mouse unless you have an
external USB hub. You can plug the HDMI cable from the Raspberry Pi directly into your TV/monitor,
assuming that your TV/monitor supports HDMI. If you have an older TV, you will need to
use the composite video out connection.
Audio output can be handled via HDMI if plugged directly into an HDMI supported TV
or monitor. If you are using the composite video out connection then you will need to
connect an audio plug via the supported analogue connection.
The internet connection uses the RJ45 connection for the wired network. You will need CAT 5 network
cable if you intend to use your Raspberry Pi to connect to the internet. You will also need a SD card
containing a valid operating system. It sounds like a lot is required to get the Raspberry Pi up and
running but it is no more than any other computer. Actually, it is less if you already have some of the
equipment in your house. Let’s run over the basics.
The Raspberry Pi. Micro USB power charger. USB Mouse. USB Keyboard.
HDMI cable or a composite video connection cable to older TV’s, SD card containing a valid
operating system, TV or monitor.
Optional: CAT 5 network cable for wired internet. Wireless adapter for wireless internet. USB hub for
plugging in additional adapters.
Getting started with the Raspberry Pi with basic terminal
If you have everything connected, you will just need to power up your Raspberry Pi. You will see a
Raspberry Pi logo appear in the top left corner of the screen and a large amount of text scrolling up the
screen.
These messages are informing you of what the device is doing. Some instructions will
display that it is trying to obtain an IP address for accessing the internet or setting the system
time via the internet. Most of these messages can be ignored for now but be aware of any
messages that appear in red and contain the word, failure. This is alerting you to any
potential problems.
If all goes well, you will be presented with a login prompt. Log in using the login name
of pi and the password of raspberry. You will be presented with a black screen and a $
prompt.
Your Raspberry Pi is now waiting for you to enter some commands. This black
screen is called a terminal and it will try to translate any commands that you issue it. The
terminal will also return the result of any commands. Let’s go over a few simple commands
to get you started.
Enter the following command and press enter.
$ ls
This will list the files and folders in your current directory. You can extend this
command by using flags to trigger more information about the file and folders. Go ahead
and enter the following and press enter
$ ls -la
This will list files using extended information. To clear this information off the screen
you can simply enter the following and press enter.
$ clear
Try typing the following and press enter.
$ date
This will of course display the date and time. This will only display the correct date if
you are connected to the internet otherwise you will have to set it yourself.
To set the time manually, enter the following.
$ sudo date –s “december 04 21:42 2012”
Don’t forget to change the date to the current date and time.
Remark: Raspberry Pi has no real-time clock (no internal battery); the date/time is received via Network Time Protocol.
At this stage, I should mention why we are typing the command sudo in front of every
command. You can think of sudo as an administrator that can perform systems wide
changes. Changing the time using the command above not only changes it for you but for
anyone logged in. Remember, Linux is based on a multi user operating system and therefore
has the ability to have many users logged in at once.
The Graphical Desktop
Using the command line is a great way to learn and understand the inner workings of the
Raspberry Pi. It is also a good way to get your hands dirty and see the core workings of the
device, but I am sure you want to see a graphical desktop and interact using your mouse.
When you are using a desktop environment and you press a button in the Graphic User
Interface (GUI), it is actually performing a lot of complex actions at an abstract layer. This is
done so that the user is kept away from the technical issues. This will allow them to focus on
being productive, rather than remembering commands and the flags that are associated with
those commands. If a user had to remember all the differing flags for a command, then their
job would be that much harder.
Let’s go ahead and run through starting your desktop. After you have logged in, enter
the following command into the console and press enter.
$ startx
After a few seconds you will see the desktop appear. This desktop is called LXDE. In
fact, the correct terminology is to address this type of desktop as a windows manager. Gnu /
Linux have a variety of window managers from KDE, Gnome, Fluxbox, XFCE and many
more. If you do not like a particular desktop, you can always remove it and add another
one. LXDE is the default desktop for the Raspberry Pi on the Debian squeeze distribution.
This is because it is lightweight and runs efficiently on small devices.
The file manager icon will give you access to any documents that you will create and throughout the
system.
Left click your mouse button on the My File Manager icon.
This will open a window that will give you access to the file system and any files that
you create. In the image below, you can see a list of files and folders. Your home directory
will look a little different as you may not have saved any files in this folder yet.
The Taskbar
 If you take a look at the bottom of your screen, you will see a panel containing a number
of icons. This panel allows you to access a number of programs and also allows you to log
out and shut down your Raspberry Pi.
If you take a look at the bottom of your screen, you will see a panel containing a number
of icons. This panel allows you to access a number of programs and also allows you to log
out and shut down your Raspberry Pi.
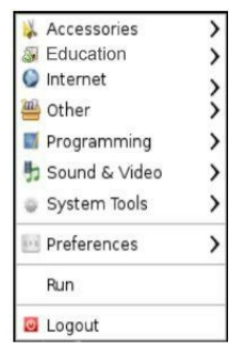
Starting from the left, you will see that there is an icon that looks like a flying bird.
If you click your left mouse button on this icon, you will see that a menu pops up displaying
a number of options.
Move your mouse pointer up to Accessories menu. Another menu will pop up showing
you a list of available programs. The file manager can be found in this menu, which you are
already familiar with. You will also find a menu item called, LXTerminal. This is the same
terminal you have been using in previous chapters to enter commands. Go ahead and click
the LXTerminal menu item. You will see a terminal window appear.
Logging out and shutting down
Let’s go ahead and shutdown your Raspberry Pi. If you look at the red power icon at the
bottom right hand corner of your desktop and left click your mouse button on this, you will
see that it will display the following screen.
Go ahead and click on the Shutdown button. This will shut down your Raspberry pi.
Applications, Tools & Servers
We will take you through a number of applications installed on your Raspberry Pi and
explain what they are used for. This is not an in depth description of how they are used but
only a description what you might what to use them for.
If you are not already logged in to your desktop, go ahead and fire this up.
geany development framework
In the programming menu you will find Geany tool. This is used
for writing, debugging and executing C, Python, Java, .. programs. It features lots of visual options
which aid in writing and debugging programs and has a clearly defined interface, so you can
concentrate on programming.
gimp – Gnu Image Manipulation Program
This is a very capable graphics application that will allow you to create Photoshop quality
images. Some of the image processing on your Raspberry Pi will take some time but when
working with smaller, lower resolution images, it will work fine.
wget
Wget is a console tool that will allow you to download files from the internet. This is
extremely useful if you are working in the console and need to obtain a file without the need
to go to your desktop and browse the internet for the file.
nano
Nano is a very fast text editing application. This is very useful when editing configuration
files on your Raspberry Pi.
The example below will start nano.
$ nano
Vi
Vi is also a very fast text editor. It is a little more complex than nano to use but it is
extremely powerful. Vi is most likely to be found in most distributions.
AbiWord
This is a small lightweight word processor, designed to support the functionality of most
modern word processors. It is similar in appearance to Microsoft Word and has much of its
functionality.
Gparted
Gparted is a graphic program used to partition devices such as hard drives, USB memory
sticks, SD cards and so on.
Commands
passwd
This tool is used when you need to change your password or another users password.
The example below will change your password:
$ passwd
The example below will change another user password, providing you have root
privileges.
$ pwd username
dmesg
dmesg is used to display a log of important events on your Raspberry Pi. It will also show
you any network devices that it has initialise along with any USB devices and memory
information.
$ dmesg
The log information produced by dmesg can get very long, so it is wise to combine this
using the less command.
$ dmesg | less
whereis
The whereis command is useful if you do not know where to find a file or program. Simply
type in, whereis, followed by the file or program you are looking for and your Raspberry Pi
will respond with its location.
$ whereis hostname
gzip
gzip is used to compress or expand a file. Files that end with a .gz are associated with a
gzipped file. To compress a file, enter the following, assuming that you have a file called
myfile.txt.
$ gzip myfile.txt
When you type ls, you will find a file in the current directory called myfile.txt.gz. This is
the original file but in a compressed format. To expand a file, simply enter the following.
The –d flag instructs gzip to decompress the file.
$ gzip –d myfile.txt.gz
Type ls and you will notice that the original file is restored.
apt-get
Apt-get is used to install, remove and update packages. This is a friendly tool that takes
away a lot of the complexity of installing programs. To install a package enter
$ apt-get install program
To update a package enter
$ apt-get update program
To remove a package
$ apt-get remove program
Administration
Why do we need to use that old looking terminal to give the Raspberry Pi instructions? The
answer is we don’t, until it all goes wrong. Computer engineers, system administrators and
network engineers often find themselves with a computer or server that will not boot up.
When this happens, they may not have access to a graphical user interface to make
administration changes. If this is the case, there may be no other alternative but to use a
terminal. Another reason for using the terminal is that it is so much faster and can be
administered remotely.
man Pages
Welcome to your best friend, the man pages. These are simply manuals for each of the
programs that are on your system. The man pages will serve your well. Let’s first see how
they are used. Open a terminal window and type.
$ man man
A page is displayed that looks a little complicated but let’s break it down. First it is
displaying NAME, and below this is the name of the program, in this case, man. Next to this
are the options available for this program. This is still a little cryptic so let’s scan down to the
DESCRIPTION section. This gives you a description of what the program does. If you
need to see more press enter to move a line at a time or space to advance a page at a time.
Press space until you reach the section headed EXAMPLE. This section shows you a
better description of what options are available and how to use them. Below this is an
overview section. This is quite an in depth manual, so at this stage, you should feel free to
read it in your own time but for now, press q to quit.
If at any time you want to know what a program does, simply enter.
$ man [program name]
For example, enter the following.
$ man ls
This will display the manual pages for the ls command.
Installing programs on your Raspberry Pi
To install a program, you will need to be connected to the internet and use a package
manager call apt. To get your Raspberry Pi online, simply plug in your network cable and
plug the other end into your router.
The command specifically for installing programs is apt-get. We will install a program
called wget which enables you to download files from the internet.
Enter the following
$ sudo apt-get install wget
Your screen will fill with information relating to the program wget. On occasion, apt-get
will need to download other programs or libraries that the program depends on. A library
can be thought of a piece of reusable information. For example, if you create a window with
a file menu and save this as a library, you can reuse this file menu in another program that
you created. You can even share your file menu library with other programmers to allow
them to use this in their programs.
Press Y when asked if you want to continue.
We are going to download a file using wget. Enter the following command
$ wget http://www.raspberrypi-tutorials.co.uk
When you press enter, you will see the following
$ wget http://www.raspberrypitutorials.co.uk
20120614 10:53:09 http://www.raspberrypitutorials.co.uk/
Resolving www.raspberrypitutorials.co.uk... 46.30.211.58
Connecting to www.raspberrypitutorials.co.uk|46.30.211.58|:80... connected.
HTTP request sent, awaiting response... 200 OK
Length: 40682 (40K) [text/html]
Saving to: `index.html'
100%[======================================>] 40,682
0.2s
168K/s in
20120614 10:53:18 (168 KB/s) `index.html' saved [40682/40682]
Wget has downloaded the default web page for www.raspberrypi-tutorials.co.uk.
You can confirm this by typing
$ ls
This will show you that wget did indeed download the file. This file is also viewable as
an html file so go ahead and type.
$ cat index.html
You will see html code which shows you how this web page was created.
Removing programs on your Raspberry Pi
To remove a program, enter apt-get remove, followed by the program name. We will
remove the wget program. Enter the following.
$ sudo apt-get remove wget
Some information will be displayed, explaining that the program is going to be removed.
We are sure that we want to remove this so press Y. Apt will safely remove the program for
you.
Searching for programs on your Raspberry Pi
It’s all very well installing and removing programs but what if you don’t know the exact
name of the program. There is a command called apt-cache. You can use this to search for
program names or part of the name. For example, I want to look for the program called
milkytracker. The problem I have is that I can only remember that it contains the word milky
in the title. I do know that it is used for creating and listening to music.
Enter the following.
$ apt-get search milky
The response should be something similar to this.
boincappmilkyway Milkyway@home application for the BOINC client
milkytracker Music creation tool inspired by Fast Tracker 2
stellarium realtime photorealistic sky generator
rpi@RaspberryPi:~$
I can see bonic-app-milkyway, which isn’t what I am looking for but milkytracker
sounds like it and looking at the description also confirms it.
Updating the package index
Remember, a package can be thought of as a program and your Raspberry Pi needs to keep
track of what packages are installed and if a newer version of package is available. The apt-
get update tool is used to keep your packages up to date with packages that exist in the
distribution repository. For example, it may be that you are running RaspberryTutor version
1.0 but the community have released version 2.0. You would use apt-get update to inform
your package manager of newly available versions or updates.
The package index on the Raspberry Pi can be found in /etc/apt/sources.list. This file
contains a list of web addresses that your Raspberry Pi will use to keep itself up to date.
Enter the following.
$ sudo apt-get update
Using TOP
Top is a command that will show you how your Raspberry Pi is performing. Enter the
following.
$ top
You will see information similar to the information below. Your information will be
different depending on which programs you are running.
top 11:05:50 up 15:07, 2 users, load average: 0.03, 0.07, 0.27
Tasks: 91 total, 1 running, 90 sleeping, 0 stopped, 0 zombie
Cpu(s): 1.0%us, 12.7%sy, 0.0%ni, 86.3%id, 0.0%wa, 0.0%hi, 0.0%si, 0.0%st
Mem: 1026492k total, 234132k used, 792360k free,
Swap: 407544k total,

A quick scan starting from the left will show the current time and the word up, which is
informing you how long the device has been up and running for. In the case above, it has
been up for 15 hours and 9 minutes. If you jump down to the next line that displays Tasks,
you can see that this will show you the amount of tasks running and the task that are
currently in a sleep state.
Cpu(s) will display how hard your ARM processor is working and Mem is the amount of
memory being used followed by how much is available.
Changing your password
It is sometimes helpful to change your password when using your Raspberry Pi. The
simplest way to do this is from a terminal window. Go ahead and enter
$ passwd
When you press enter you will get a response asking you for the current password. This
is a security measure in case you left the room with your terminal logged in and someone
tried to change the password without your knowledge.
Remember that the Raspberry Pi is a Gnu/Linux operating system and therefore is a
multiuser environment. It simple terms, lots of people can logged in and use the resources
and programs simultaneously.
Changing password for bako.
(current) UNIX password:
Unix password? What is that? Linux was based on another operating system called
Unix. You can think of this as the wise grandfather of Linux.
Go ahead and enter your new password. You will be prompted again to retype the
password.
Enter new UNIX password:
Retype new UNIX password:
passwd: password updated successfully
Adding a new user to your Raspberry Pi
If you need to add another user to your Raspberry Pi, you can do this from the console.
Let’s assume you have a child and you really do not want them to destroy any of the files
you have created using your account. Go ahead and enter the following commands.
$ sudo adduser nicolas
We have issued the command adduser, followed by the name doris. You can replace
the name doris with any login name you require. When you press enter, you should see the
following information.
[sudo] password for rpi:
Adding user `nicolas' ...
Adding new group `nicolas' (1002) ...
Adding new user `nicolas' (1001) with group `nicolas' ...
Creating home directory `/home/nicolas' ...
Copying files from `/etc/skel' ...
Enter new UNIX password:
At this point enter a password for the doris account and retype the password to confirm.
Next it will ask you for some user details, enter the required information. If you don’t have
all the information available or it isn’t relevant, simply press enter.
The nicolas account has been created for you.
Networking
The simplest way to get your Raspberry Pi on the internet is to plug a network cable or
CAT-5 cable into the Ethernet port and plug this cable directly into your router. Your
Raspberry Pi will automatically detect the settings that it needs.
The ping tool
Ping is a command tool that is used to test if a computer is connected to the internet and that
it is responding. You may hear the term ping a host or host name, which is referring to a
computer or device. If you imagine yourself walking to each house on your street and
knocking on the door to see if anyone opens the door and responds with “Yes”, then they are
responding to your request. Ping is effectively doing the same thing. Let’s see ping in
action.
Open a terminal window and enter the following command. We are telling ping the
destination IP address of the host we want to contact and the –c 5 means the number of times
we want to ping the host. If we typed –c 10, we would expect to try and ping this host 10
times.
pi@raspberrypi ~ $ ping 192.168.1.1 -c 5
PING 192.168.1.1 (192.168.1.1) 56(84) bytes of data.
64 bytes from 192.168.1.1: icmp_req=1 ttl=64 time=5.64 ms
64 bytes from 192.168.1.1: icmp_req=2 ttl=64 time=6.40 ms
64 bytes from 192.168.1.1: icmp_req=3 ttl=64 time=3.42 ms
64 bytes from 192.168.1.1: icmp_req=4 ttl=64 time=66.7 ms
64 bytes from 192.168.1.1: icmp_req=5 ttl=64 time=3.29 ms
--- 192.168.1.1 ping statistics ---
5 packets transmitted, 5 received, 0% packet loss, time 4006ms
rtt min/avg/max/mdev = 3.299/17.107/66.771/24.861 ms
Interfaces
In order to get or set the IP address on your Raspberry Pi you must edit interfaces file.
This file is situated in the /etc/network directory.
You can edit it with vi editor with root permissions.
$cd /etc/network
$sudo vi interfaces
(you may get something like this)
auto lo
iface lo inet loopback
iface eth0 inet dhcp # using DHCP server
#iface eth0 inet static
#address 192.168.1.2
#netmask 255.255.255.0
#address 172.19.64.152
#netmask 255.255.248.0
#gateway 172.19.64.3
#nameserver 172.19.0.4
allow hotplug wlan0
iface wlan0 inet static
address 10.0.0.1
netmask 255.255.255.0
Note that the example above contains several configurations including dynamic (dhcp) and static IP
addressing.